Beeinträchtigt eine Holzverkleidung die RFID Funktion
Eine Holzverkleidung sollte grundsätzlich keine gravierende Verschlechterung der RFID Reichweite verursachen, aber sie reduziert diese mit zunehmender Dicke natürlich zumindest um die Holzstärke.
Holz ist auch nicht Holz und so schirmt zum Beispiel Lärche, Fichte oder Tanne auf Grund Ihres hohen Harzgehaltes elektromagnetische Strahlung fast doppelt so stark als z.B. Eiche.
Mt den mitgelieferten Transpondern sollte das überhaupt kein Problem darstellen, aber bei implantieren Chips empfehlen wir die Eignung auf Grund der technologisch eingeschränkten Reichweite mit den eigenen Tieren zu prüfen.
What can I do, if the door doesn't recognize the implanted transponder?
In the use of the supplied RFID transponder might not be an acceptable alternative, implantation of an additional chips might be an option.
In this case, please test the chip before it is implanted. Once implanted it might be necessary to register your pet in various positions in front of the door, as the door reacts on the chip that responds first and in certain occasions the old one might still be quicker.
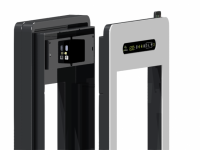
RFID access control
RFID access control
General
petWALK pet doors use RFID technology for contactless access control. But what is it and how does it work?
In this post we try to answer this and many other related questions.
What is RFID?
The abbreviation RFID stays for radio-frequency identification, which means identification by electromagnetic waves".
RFID enables the automatic identification and localization of objects and living beings.
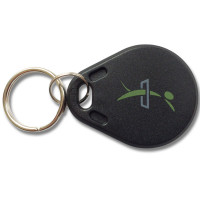
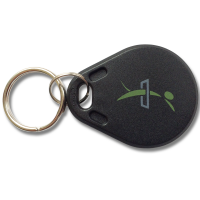
An RFID system consists of a transponder, the microchip which is located on or in the object or living organisms, and includes an identifying code and a reader for reading this code.
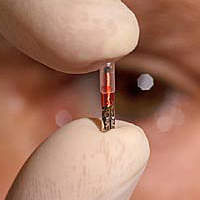
The micro chipp in your pet is a tiny implant, about the size of a grain of rice, which your vet injected painlessly under the skin.
How does RFID work at petWALK?
Once the petWALK pet door recognizes your cat or dog and access control is enabled, the built-in RFID reader is turned on and the RFID antenna is activated in the middle of the door leaf.
The microchip in or on your cat or dog has no battery, but is powered by the antenna in the petWALK petflap with energy.
Once the chip receives enough energy, it starts transmitting his identification as a radio station on a certain frequency.
The petWALK animal door is listening now for about 10 seconds (orange flashing lock icon) on that frequency, and once it detects a known chip, opens the door.
How to use RFID access control
The following video explains how to activate and setup the RFID access control.
Possibilities and limitations of RFID
The petWALK pet door is compatible with all standard animal identification chips in accordance with the ISO standard 11784/11785 FDX-B.
However, this technology dates back from the 70s and has been standardized almost 20 years ago (1996). It is hopelessly outdated and has a number of annoying limitations. Nevertheless it is normally enough to use such implanted chips as a key for the petWALK flap.
However, as a pet door manufacturer we have no influence on the quality of the transponder in your cat or dog and therefore can't give any warranties with respect to the function or range.
We therefore recommend to test with your own pets if detection range is sufficient before installation. Shouldn't it be possible to learn the tag or the distance too limited, it is not a malfunction of the device, but a technical limitation of the ID chips.
How far is the detection range?
The typical reading distance of well-tuned implanted chips is approximately 10 cm up to 20 cm. The included small colar tags should provide a reading distance of at least 15-25 cm, the big transponders at least 20-30 cm. In learning mode, the distance usually is half the normal reading distance.
The actual achievable range is dependent on many factors. The biggest challenges are the power supply of the transponder, the transmission frequency and the position of the transponder towards the antenna.
On the first point, there are legal provisions, how much energy is allowed to be sent by the antenna without interfering with other electronic devices EMV standard). Depending on the quality of the chip in or on your pet it needs more or less energy to activate itself. If it needs more energy it need to get nearer to the antenna.
The principle is called inductive coupling. The distance between the two coils is the wireless transmission link and should be minimized. The greater the distance of the two coils the flux leakage is massively increased, so that the inductive coupling is reduced and the efficiency deteriorates. Typical distances, which can be bridged by this method are approximately the coil diameter up to twice the coil diameter.
The coil diameter of the transponder in your pet is only a few millimeters, so the theoretically achievable distance is also limited to a few centimeters. This is also the reason why the much larger compared collar tag works so much better.
The second challenge is the correct transmission frequency. Although this is defined in the standard and the petWALK pet door adheres very closely to it (it is adjusted daily). But specially implanted chips often exhibit considerable variation, which means that they do not send on the agreed frequency. One can imagine as if you were listening to a radio program with a mistuned radio. There is noise and you can hardly hear anything. Only when the signal becomes stronger, which means your pet gets closer to the antenna, one can recognize the data.
The third factor is the position of the transponder in the electromagnetic field. This means, as the chip that looks like a grain of rice, is aligned with the antenna in the door leaf. It works best when it stands normal to the door leaf and very poor when he is in a parallel position. This has physical reasons (magnetic field of coil) through the construction of the implanted transponder. This fact has a dramatic impact on the read range of works great not to.
To maximize the reach petWALK doe not read the numerical value of the chips, but analyzes the frequency spectrum of the chip by means of complex mathematical methods and compares it with previously stored patterns.
The range of the chip can not be changed on the door.
What should you look for when implanting?
Positioning:
Typically, an identification chip is implanted by a veterinarian into the left neck. For use with a petWALK pet door it would be beneficial if this were as far forward as possible closely behind the ear. It is also helpful if the veterinarian injects the chip in a way that it lies horizontally. That way the chip can absorb most of the energy and can start sending earlier.
Implant:
We recommend to test the microchip prior to implantation at our door.
It should be noted that the chip is in the syringe very well shielded by the metal needle. If, however, the syringe with the tip forward moved toward the door leaf, the chip should be able to be detected in 3-5 cm distance. If successful, the chip will work in the animal body before our pet door.
Of course, you pet might still have to practice a bit to get to the appropriate part of the body as close as possible to the door. Usually your pets are quite smart and learn very quickly.
The range depends on the quality of the transponder. Usually transponder from brand manufacturers such as by Virbac of "Back Home Biotec" work very well.
Tips
What can I do, if the door doesn't recognize the implanted transponder?
In the use of the supplied RFID transponder might not be an acceptable alternative, implantation of an additional chips might be an option.
In this case, please test the chip before it is implanted. Once implanted it might be necessary to register your pet in various positions in front of the door, as the door reacts on the chip that responds first and in certain occasions the old one might still be quicker.
Der implantierte Chip konnte angelernt werden, aber die Reichweite ist zu gering
Hat die Türe den Chip erkannt, dann ist die Reichweite im Betrieb ca. doppelt so hoch wie beim Anlernen. Falls dies zu gering sein sollte, dann hilft möglicherweise nur eine Implantation eines neuen Chips. Im Graubereich könnte man aber auch noch RFID Innen deaktivieren und mit Bewegungserkennung arbeiten, sodass die Türe wie eine Eingangstüre mit Knauf funktioniert, also von außen muss man Sie aufsperren und von innen kann man ohne Schlüssel aufmachen.
RFID Zutrittskontrolle
RFID Zutrittskontrolle
Allgemeines
petWALK Tiertüren nutzen die RFID Technologie zur berührungslosen Zutrittskontrolle.
Aber was ist das überhaupt und wie funktioniert es?
Dies und viele weitere Fragen möchten wir Ihnen in diesem Beitrag versuchen zu beantworten.
Was ist RFID?
Die Abkürzung RFID basiert auf dem englischen Begriff „radio-frequency identification”, was soviel wie „Identifizierung mit Hilfe elektromagnetischer Wellen“ heißt.
RFID ermöglicht die automatische Identifizierung und Lokalisierung von Gegenständen und Lebewesen.
Ein RFID-System besteht aus einem Transponder, dem Mikrochip, der sich am oder im Gegenstand bzw. Lebewesen befindet und einen kennzeichnenden Code enthält, sowie einem Lesegerät zum Auslesen dieser Kennung.
Der Mikrochip Ihres Tieres ist ein winziges Implantat, etwa in der Größe eines Reiskorns, welches Ihr Tierarzt völlig schmerzfrei unter die Haut injiziert.
Wie funktioniert RFID bei petWALK?
Die Funktion der Tiertüre basiert auf einem 2stufigen Erkennungsverfahren.
Die Grundfunktion der Tiertüre ist die Erkennung einer Bewegung eines Lebewesens vor der Türe. Dies wird mit den beiden PIR-Sensoren (1 x außen und 1 x innen) erkannt.
Der PIR für Innen befindet sich oberhalb des Türflügels an der Elektronik (schwarze Metallabdeckplatte mit S/N-Aufkleber) in der Nähe der Mitte und ist ein kleiner, schwarzer Zylinder, der schräg montiert ist. Die schwarze Mechatronikabdeckung mit dem Aufkleber können sie im ausgebauten Zustand der Tiertüre erkennen, sowie bei einem Tunneleinbau.
Der PIR für außen befindet sich an der Unterkannte des Türflügels in der Mitte (eingebaut) und ist nur bei geöffnetem Türflügel sichtbar. Sie sehen an der senkrechten Fläche die kleine runde Prismenabdeckung des Sensors.
Erkennt einer der beiden Sensoren eine Bewegung, wird dies durch oranges Leuchten des entsprechenden Haus-Symbols angezeigt. Ist die entsprechende Funktion: Öffnen bei Bewegung aktiviert (Symbol: Haus IN/Haus OUT = grün), dann öffnet die Tiertüre sobald eine entsprechende Bewegung erkannt wird.
Als zusätzliche Sicherheitsfunktion kann zur Bewegungserkennung nun die RFID basierende Zutrittskontrolle eingeschaltet werden (Symbol: Schloß=grün). Wenn die Zutrittskontrolle aktiviert ist, dann öffnet die Tiertüre nicht sofort, wenn sie eine Bewegung erkannt hat, sondern versucht nun für ca. 10 Sekunden lang einen gültigen RFID-Chip zu lesen (Symbol: Schloß=blinkt orange).
Der Mikrochip in oder an Ihrer Katze oder Hund enthält keine Batterie, sondern wird durch die Antenne in der petWALK Tiertüre mit Energie versorgt. Sobald der Chip genug Energie empfängt, beginnt er seine Identifikation wie ein Radiosender auf einer bestimmten Frequenz zu senden.
Die petWALK Tiertüre lauscht nun für ca. 10 Sekunden (orange blinkendes Schlosssymbol) auf dieser Frequenz und sobald sie einen bekannten Chip erkennt, öffnet sie die Türe.
Wird ein bekannter Chip gültig erkannt, dann öffnet die Tiertüre und zeigt die Nummer des Tiers an. Erfolgt jedoch in den 10 Sekunden des Lesezyklus keine gültige Chip-Erkennung wird der ganze Vorgang abgebrochen und die Tiertüre initialisiert das ganze Sensorsystem neu (Symbol: Türe = leuchtet rot). In diesem Zustand ist die Benützung der Tiertüre nicht möglich, da während der Initialisierung sämtliche Funktionen gesperrt sind.
Nach diesem Vorgang (Initialisierung) ist die Tiertüre wieder in der normalen Grundfunktion und wartet darauf, ob eine BEWEGUNG eines Tiers erkannt wird. Dann beginnt der Zyklus erneut und die Tiertüre versucht wieder für ca. 10 Sekunden einen gültigen RFID-Chip zu lesen (Symbol: Schloß=blinkt orange).
D.h. im Falle, dass der Chip eines Tieres bei aktivierter Zutrittskontrolle nicht innerhalb der 10 Sekunden gelesen werden kann, passiert nach Ende der 10 Sekunden nichts weiter, solange bis die Tiertüre erneut durch eine BEWEGUNG ausgelöst wird!
Für die optimale Erkennung der RFID-Chips ist die Position vor der Türe sehr relevant. Beachten sie dazu bitte die Skizze im beiliegenden Infoblatt. Grundsätzlich muss dabei auch noch berücksichtigt werden, dass die implantierten Chips eine deutlich geringere Reichweite haben, als die Halsband-Anhänger. D.h. damit muss das Tier auch in optimaler Position und deutlich näher am Türflügel sein, als mit dem Anhänger. Ist der implantierte Transponder zu klein, kann es sogar vorkommen, dass dieser auch in optimaler Position des Tiers nicht korrekt gelesen werden kann. Im Zweifelsfall erfragen sie bitte bei ihrem Tierarzt die genaue Type und vor allem Größe des implantierten Transponders.
Außerdem ist auch noch die Lage des RFID-Chips sehr relevant. Die Lageveränderung des Chips in den drei Dimensionsachsen hilft ihnen heraus zu finden, in welcher Lage die Erkennung besser, bzw. weniger gut funktioniert. Am besten können sie das ausprobieren indem sie ihr Haustier dazu entsprechend in optimaler Position vor der Tiertüre (mittig vor dem Türblatt – siehe Skizze) mit der Hand halten und während des RFID-Lesezyklus drehen und neigen.
So verwenden Sie die RFID Zutrittskontrolle
Im folgenden Video erklären wir Ihnen, wie Sie die RFID Zutrittskontrolle aktivieren und einstellen können.
Die RFID Technologie - Möglichkeiten und Grenzen
Die petWALK Tiertüre ist mit allen herkömmlichen Tieridentifikationschips gemäß dem ISO-Standard 11784 / 11785 FDX-B technisch kompatibel.
Diese Technologie stammt jedoch aus den 70er Jahren und wurde vor fast 20 Jahren (1996) standardisiert. Dadurch ist sie eigentlich hoffnungslos veraltet und bringt eine Reihe von lästigen Einschränkungen mit sich. Aber sie erlaubt, dass im Normalfall ein solcher implantierter Chip auch als Schlüssel für die petWALK Tiertüre verwendet werden kann.
Als Hersteller der Tiertüre haben wir jedoch keinen Einfluss auf die Qualität des Transponders in Ihrem Tier und können daher auch keinerlei Garantie im Hinblick auf die Funktion oder Reichweite abgeben.
Wir raten daher vor dem Einbau mit seinen Tieren zur prüfen, ob die Erkennungsreichweite ausreichend ist. Sollte es nicht klappen, so handelt es sich um keine Fehlfunktion des Gerätes, sondern um die technische Limitierung des ID-Chips.
Wie hoch ist die Erkennungsreichweite
Der typische Leseabstand eines gut abgestimmten implantierten Chips liegt bei ca. 5 cm bis maximal 20 cm. Die mitgelieferten Halsbandanhänger sollten einen Leseabstand von mindestens 15-25 cm bieten, die großen Chips mindestens 20-30 cm. Im Lernmodus beträgt der Abstand in der Regel die Hälfte der normalen Lesedistanz.
Die tatsächlich erreichbare Reichweite ist jedoch von vielen Faktoren abhängig. Die größten Herausforderungen sind dabei die Stromversorgung des Transponders, die Sendefrequenz und die Position des Transponders zur Antenne.
Zum ersten Punkt gibt es rechtliche Bestimmungen, wie viel Energie die Antenne aussenden darf ohne andere elektronische Geräte in der Nähe (EMV-Standard) zu stören. Je nach Qualität des Chips in oder an Ihrem Haustier benötigt dieser mehr oder weniger Energie um sich zu aktivieren, das heißt er kann mehr oder weniger weit von der Antenne entfernt sein.
Das Prinzip nennt sich Nahfeldübertragung oder induktive Kopplung. Der Abstand zwischen den beiden Spulen stellt die drahtlose Übertragungsstrecke dar und sollte möglichst gering sein. Bei größerem Abstand der beiden Spulen nimmt der Streufluss stark zu, womit die induktive Kopplung sinkt und der Wirkungsgrad sich verschlechtert. Typische Abstände, die mit diesem Verfahren überbrückt werden können, betragen ungefähr den Spulendurchmesser bis zum doppelten Spulendurchmesser.
Der Spulendurchmesser des Transponders in Ihrem Tier beträgt nur wenige Millimeter, daher ist die theoretisch erreichbare Entfernung auch auf wenige Zentimeter beschränkt. Das ist auch der Grund weshalb der im Vergleich viel größere Halsbandanhänger so viel besser funktioniert.
Die zweite Herausforderung ist die richtige Sendefrequenz. Diese ist zwar im Standard festgelegt und die petWALK Tiertüre hält sich auch sehr genau daran (sie justiert diese sogar täglich). Speziell die implantierten Chips weisen aber oft beträchtliche Abweichungen auf, was bedeutet, dass sie nicht mit der vereinbarten Frequenz senden. Man kann sich das vereinfacht so vorstellen, als würde man ein Radioprogramm mit einem Radiogerät hören, bei dem die Frequenz verstellt ist. Es wird rauschen und man kann kaum etwas verstehen. Erst wenn das Signal viel stärker wird, also in unserem Fall das Tier näher an die Antenne kommt, kann man die Daten erkennen.
Der dritte Faktor ist die Position des Transponders im elektromagnetischen Feld. Das bedeutet, wie der Chip, der wie ein Reiskorn aussieht, zur Antenne im Türblatt ausgerichtet ist. Es funktioniert am besten, wenn dieser normal zu dem Türblatt steht und ganz schlecht, wenn er in einer parallelen Position liegt. Dies hat physikalische Gründe (Magnetfeld von Spulen) durch die Konstruktion des implantierten Transponders. Dieser Umstand hat einen dramatischen Einfluss auf die Lesereichweite von funktioniert großartig bis gar nicht.
Um die Reichweite zu maximieren liest petWALK nicht wie die Geräte von Tierärzten den Zahlenwert des Chips aus. Stattdessen analysiert petWALK das Frequenzspektrum des Chips mittels komplexer mathematischer Methoden und vergleicht dieses mit zuvor gespeicherten Mustern.
Die Reichweite des Chips kann an der Türe nicht verstellt werden.
Worauf muss man beim Implantieren achten?
Positionierung:
In der Regel wird ein Identifikationschip vom Tierarzt in den linken Hals implantiert. Für die Verwendung mit einer petWALK Tiertüre wäre es von Vorteil, wenn dies so weit vorne wie möglich möglichst hinter dem Ohr wäre. Hilfreich ist auch, wenn der Tierarzt den Chip so injiziert, dass er horizontal im Körper liegt mit einer der Spitzen zur Türe hin, d.h. normal auf das Türblatt stehend. So kann der Chip die meiste Energie aufnehmen und natürlich auch wieder abgeben.
Implantat:
Wir empfehlen nach Möglichkeit den Microchip vor der Implantation an unserer Tiertüre zu testen.
Zu beachten ist dabei, dass der Chip in der Spritze durch die Metallnadel sehr gut abgeschirmt wird. Wenn man aber die Spritze mit der Spitze nach vorne zum Türblatt hinbewegt, sollte der Chip in ca. 3-5 cm Abstand erkannt werden können. Wenn dies gelingt wird der Chip auch im Tierkörper vor unserer Tiertüre funktionieren.
Natürlich kann dann auch sein, dass auch das Tier noch etwas üben muss, um mit dem entsprechenden Körperteil möglichst nahe zur Türe zu kommen. Dies lernen die Haustiere in der Regel aber sehr rasch.
Die Reichweite ist von der Qualität des Transponders abhängig. In der Regel funktionieren Transponder von Markenherstellern wie z.B. von Virbac der „Back Home Biotec“ gut.
Tipps
Der implantierte Chip konnte angelernt werden, aber die Reichweite ist zu gering
Hat die Türe den Chip erkannt, dann ist die Reichweite im Betrieb ca. doppelt so hoch wie beim Anlernen. Falls dies zu gering sein sollte, dann hilft möglicherweise nur eine Implantation eines neuen Chips. Im Graubereich könnte man aber auch noch RFID Innen deaktivieren und mit Bewegungserkennung arbeiten, sodass die Türe wie eine Eingangstüre mit Knauf funktioniert, also von außen muss man Sie aufsperren und von innen kann man ohne Schlüssel aufmachen.
Transponder kann angelernt werden, wird aber dann nicht mehr erkannt
Wenn Sie den Chip beim Lernen parallel zum Türblatt halten, sollte dieser mind. 15cm davor erkannt werden. Danach versuchen Sie bitte den Chip ein weiteres Mal anzulernen. Die Türe sollte ihn erkennen und auf den ursprünglichen Programmplatz springen. Sollte sie jedoch auf die nächst höhere Ziffer springen, ist dies ein Indikator für eine Störquelle über dem erlaubten Grenzwert (Handymast, Funksender, Solaranlage, Telekabelanbieter, intelligenter Stromzähler etc.) im Umfeld der Türe, ebenso wenn die Reichweite des mitgelieferten Chips unter 10cm liegen sollte.
Möglichkeiten, wenn der implantierte Chip nicht angelernt werden kann
Falls die Verwendung eines mitgelieferten RIFD Transponders am Halsband nicht in Frage kommt, so kann die Implantierung eines zusätzlichen Chips in Betracht gezogen werden.
Bitte kontaktieren Sie aber vor einem solchen Schritt unbedingt unseren Kundendienst, der Ihnen gerne mit Rat und Tat zur Seite steht.
Auf jeden Fall sollten Sie das Produkt vorher ausprobieren und erst dann implantieren. Besorgen Sie sich einen "Opferchip" aus der gleichen Charge des Produktes, das implantiert werden soll, und testen es mit Ihrem Tier in dem Sie den Chip mit einem Stück Klebeband am Fell temporär befestigen.
Zur Sicherheit sollte bei zwei Chips der Anlernvorgang in verschiedenen Positionen wiederholt werden, damit beide Transponder angelernt werden, sofern sie beide funktionieren. So öffnet dann derjenige Chip, der zuerst antwortet.
Erst wenn die Tests ohne jedes Problem erfolgreich waren und Ihr Tier die Türe problemlos bedienen kann, sollten Sie dieses weiteren Transponder implantieren lassen!
Die petWALK Tiertüre erkennt den Mikrochip meines Tieres nicht
Falls die Tiertüre den Tierchip Ihres Tieres nicht erkennt, prüfen Sie bitte zunächst folgende Punkte:
- Ist die Tiertüre eingeschaltet? (Uhrzeit und Netzlampe leuchten)
- Ist Ihr der Tierchip eingelernt? Falls nicht, finden Sie in der Bedienungsanleitung mehr zu diesem Thema.
Sollte der Chip wiederholt nicht erkannt werden können, kann dies aus mehreren Gründen geschehen: Weiterlesen →
Driving rain resistance according to EN 12208 - 1999–11
ClassE1050
RFID (Animal ID)
Implanted or external Transponders per ISO standards 11784 / 11785 FDX-B
Range with implanted transponders
0-15cm
Range with collar tag transponders
15-30cm
Burglary resistance
Through a contactless access control system
Through a built-in alarm system
Through a contactless access control system
By integrating into existing alarm systems
Through a contactless access control system
By using WK2 certified hardware and high-strength materials
Climatic conditions
Inside
0°C to +40°C
Outside
-40°C to + 85°C
Power supply
Input voltage
90-264V AC
Output voltage
24V DC
Base load
0,2A
Cable length
1,8m
Accu Pack
12V 0,8A
Clock backup battery
CR3220
Sensors
Capacitive movement sensors
PIR movement sensors
Light sensor
Rain sensor (optional)
IR-Receiver
Reed contact
Secondary Reed contact (optional for door assably)
Interfaces
Output for external alarm systems
Serial interface
How difficult is it to get easily scared animals used to the petWALK pet door?
In countless cases we have made the experience that also very timid animals quickly get used to petWALK pet doors and show no problems to accept them.
This is explained mainly by the completely different design and functioning of petWALK pet doors.
Unlike traditional manual cat flaps, where the animals have to press the flap with their heads, petWALK opens the door like an invisible butler "thought- controlled", almost silently and automatically.
As most of the animals are used to go through doors or windows, the mode of operation of petWALK pet doors is no surprise to them.
Furthermore petWALK pet doors - already the smallest size- offer pleasantly large through holes. So the animals can stride through the door as on the catwalk with their heads held high and no longer have to squeeze through narrow openings.
petWALK also allows the animals to gradually and cautiously adapt to the newly-found freedom.
The following procedure has proven particularly useful:
First, open the door manually and give the animal time to spot the opening.
Then operate the door by motion sensor and set the door opening time to maximum value.
Then gradually reduce the opening time.
If the animals have lost the fear, then you switch to RFID access control. Optionally, you can also use RFID at only one side (outside) and so, for example, continue to operate the exit by motion sensor.
We recommend practicing as long as possible at the beginning with the RFID collar chip because it provides a greater detection range.
If the operation runs smoothly, then you can try to switch to the operation by implanted RFID chip.
Only when your animals have become completely used to their door, activate limiting programs, such as time, brightness and moisture control.
Is it difficult to teach my cat / dog the use of petWALK?
The use of the petWALK pet door is very easy for your pets as they do not have to push the door with the head in order to open it.
The petWALK door can be used with the built-in motion detector as well as with an RFID chip. From our experience we know that both, dogs and cats will learn the function very quickly. In order to make your pets familiar with their new possibilities, we recommend operating the pet door for the first few days by motion sensor. If your pet moves in the vicinity of the pet door, it will open. Your pet will first of all examine this very interesting change, sit curiously in the pet door to inspect the new clearance. But after a short time your pet will of course be able to use the infinite possibilities of the door.
If you want to avoid the use of your pet door by strange animals, such as a neighbour's naughty cat, it is now time to switch to RFID (animal chip) control. For this purpose we advise in the first phase the enclosed RFID collar chip. This collar chip shows in most cases a greater range than the chips implanted by the vet (25-30 cm) and is therefore easier to use for the adjustment period. Has your pet been accustomed to the door, you can switch to door control by implanted RFID chip.
Usually the chip is implanted at the shoulder of the animal. We have found out that the chip might move over time, also the quality of the used animal chip used may vary. So in rare cases it can happen that the petWALK door opens only if your pet is already very close to the door. Once your pet has learned to appreciate the new freedom, it will also have learned very quickly how to deal with this condition. At least this is what happened in our field trials.
Troubleshooting
Small Problems quickly solved
General
petWALK Pet doors are built very robust and have proven themselves over many years in the global heavy use of the tropics to the Arctic Circle, by beautiful family house to shelter. Nevertheless, they are highly complex devices which sometimes have problems or questions may arise during operation.
In the following sections, we show you how you can fix most problems quickly yourselve.
Error Message in Display
E01 - DOOR CONTACT ERROR (Door could not open)
Error Cause:
This error message is displayed when the door leaf is blocked during the opening process.
If this blocking item is removed at the next opening attempt the petWALK pet door will operate again normally. For information purpose the error message remains on the display.
Error handling:
Check if any object prevents the petWALK pet door from opening or if any other reason exists which stops the opening process.
If you have removed the blocking item from the swivel range of the pet door, confirm the error message by pressing the OK button on your remote control. The error message on the display will disappear.
E02 - ERROR DURING CLOSING PROCESS (Door blocked)
Error cause:
This error message is displayed when the door meets an obstacle during the closing process and thus is not able to close.
If the door meets an obstacle during the closing process, it will stop immediately. After a waiting period of 2 sec an acoustic signal will sound and another closing attempt will start.
After the 3rd unsuccessful attempt this error appears on the display.
These closing attempts are carried out until the obstacle has been eliminated. The error message remains, however, to inform you of this fact.
Error handling:
If the petWALK pet door is still open, you have to remove the obstacle. If the pet door is closed again, you should check which object has prevented the door from closing to avoid this situation in the future. Afterwards you confirm the error message by pressing the OK button on your remote control. Thus, the error message disappears on the display.
E03 - DOOR DOES NOT CLOSE DESPITE OF RUNNING DRIVE MOTOR
Error cause:
E03 is displayed, if the door does not close within a given time period although the engine is running. The reason could be a loose slip clutch because of age-related wear and tear. This is not a restriction in normal operation.
The slip clutch serves as an additional safety device in operating process to prevent pinching even in case of an electronic defect. Over time, the slip clutch can get loose due to normal use. This is absolutely no security risk, since pressure on an obstacle in the door will even get lower. But the grinding of the slip clutch accelerates the process of attrition, which may cause the effect that the clutch begins to slip even in normal operation and at some point will no longer close. In this case, we recommend servicing the petWALK pet door. You will find further information on our website.
In the chapter "Frequently Asked Questions" you can also find more information on setting the slip clutch and under what conditions you can do this.
Error handling:
When the door is still open, you have to remove the obstacle. When the door is closed again, you should check what could have prevented the pet door from closing to avoid this situation in the future. Afterwards you confirm the error message by pressing the OK button on your remote control. Thus, the error message disappears on the display.
Use the following video as a manual to adjust the slip clutch or print the instructions.
E05 - WRONG POWER SUPPLY CONNECTED
Error cause:
This error means that the input voltage does not match with the actual configuration of the pet door.
This could happen e.g. if the door is connected to a 12-volt power supply and the battery pack is connected. In this case charging of battery is not possible.
Error handling:
Confirm the error message with the OK button on your remote control. Thus, the error message on the display disappears.
So the functionality of the pet door is not affected for a certain period. But you should switch to 24V input voltage as soon as possible in order to charge the backup battery for emergency operation or unplug the backup battery.
E06 - ERROR DURING ADJUSTING THE RFID ANTENNA
Error cause:
This error code indicates that a tuning of the antenna is not possible, because e.g.the connection cables have been interrupted.
The integrated RFID antenna is tuned automatically during initial installation and periodically once a day. If tuning fails the system shows this error.
Error handling:
Confirm message with the OK button on your remote control. Thus, the error message disappears on the display.
The pet door can still be operated but only by motion detection. To eliminate the error, please contact our service support team or one of our contractors.
A00 - INTRUDER ALARM
Error Cause:
This error message is displayed with a simultaneous alarm signal when the petWALK pet door has lost the door contact in closed state and so has been forced open.
Error handling:
If this error occurs, the pet door might have been broken up by force and needs to be repaired or replaced. You can disable this error message and the alarm signal by pressing the OK button.
In very rare cases, this alarm can also be triggered, when a heavy object hits the pet door in the exact moment of the door starting the locking engine and so the pet door ruptures just before the blockage (e.g. due to stormy weather). In this situation, you will find your pet door with this error message in the closed state, since it was able to close during the next attempt. Then the error message refers to this problem and you just need to confirm with the OK button. The animal door is ready for use again. Nevertheless, you should check your pet door for damage.
Startup problems
The door does not close (can not easily be moved in the closed state)
-
Basically, the door panel is factory-set in the way that the silicon sealing is pressed against it with a gentle pressure and closes completely air tight. Over time, however, the pressure can change.
-
For a high quality closure, an asymmetrical mushroom cap is used, which enables that a manually opened pet door can be turned frontal with a TORX T15. By rotating (up to 360 degrees), the contact pressure of the door leaf can change.
-
The door closes more easily when the flattened side of the pane is facing inwards
The pet door does not respond to the remote control
-
Check that the protective foil at the bottom of the remote control has been removed.
-
Check that the battery is not inserted the wrong way.
-
The remote control works like your TV remote control with infrared. The transmitter of the remote control is located at the upper end, which needs to point towards your pet door. The range is up to 10 meters and decreases to the side.
-
The remote battery can possibly be empty. In this case, replace it by a corresponding new battery.
-
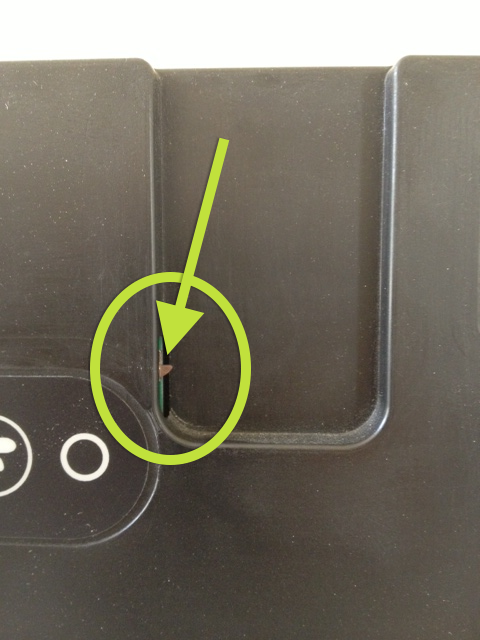
Check if the IR-switch in the remote control compartment is not damaged and looks like in the picture:
When you plug in the power supply for the first time the display remains dark
-
Check if the power is actually switched on (power socket, fuse).
-
Check if the connector of the power supply is actually connected to the door.
-
Verify that the 3 connection cables are stuck between the inner and outer flange
Problems during operation
Door does no longer react on remote or on pet
In rare cases it can happen that the door stops responding. As with a computer, a restart will fix the problem in most cases.
The easiest way is to unplug the power supply from the wall socket and wait until the battery is discharged and the door has shut down and all lights are extinguished in the display. This might take a few hours. Then plug in the mains power on again. The door will function normally again.
The models "Super-Silent" and all doors manufactured after 1.1.2015 (serial number higher than xxx01Dxxxxxxxxxx), offer also some quicker ways:
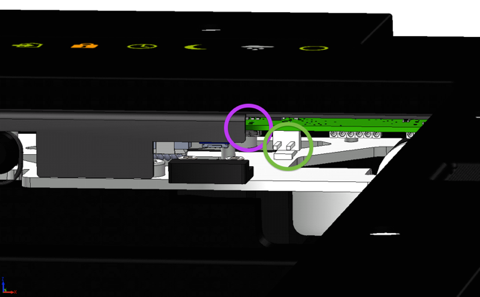
If you own a "Large" model remove the inner cover of the door leaf. You will see a small slot on one upper corner of the door leaf and a locking bolt below it. On the model "Medium" you can access the bolts without removing the cover.
Now move the upper bolt by means of a medium-sized screwdriver gently but with pressure against the resistance of the motor. You will hear a slight noise from the engine while pushing the bolts. This is normal and will not harm the door.
As soon as you open the door panel slightly, it should trigger the burglary alarm. The display should show "A00" and an alarm sound can be heard. Hold the door leaf until you confirmed the error by pressing OK on the remote control. After that, the door should function normally again.
Here's a small video showing these steps:
If no alarm is triggered, you can remove the white battery connector with the red and black wires and unplug the power supply. When using an in-wall power supply you can switch off the fuse for a short time. Plug both in again.
There's also a small reset button between the cover and the white battery connector in the area right above the white component, which protrudes slightly from the shroud. Here you could carefully press the reset button with a pen or similar. After a successful reboot the red circle appears in the display. After a rattling noise the pet door is initialized and ready for operation.
What should be done if the locking bolts do not always open completely and are thus blocking the door?
It could be that position of the door leaf is not correct and it is inclined. This can happen when the wing of the upper hinge has come loose and out of the door leaf for example by a blow.
Our advice: check if the door leaf is properly positioned. You can check this easily by means of the gap distances on the outside of the door module. The gaps should all be about the same on all four sides and at the edge of the door leaf be parallel to the device. See little draft attached.
If the door hangs down, you can beat the hinge bolt of the upper hinge (green arrow) with door leaf slightly open from the bottom out of the hinge block and screw the hinge wing into the door leaf by 1/2 to 1 turn to the right (clockwise) . Then reintroduce the bolt from above and test it. If the door leaf is well positioned now and the door opens properly, punch in the bolt again easily from above.
The door does not close (can not easily be moved in the closed state)
-
Basically, the door panel is factory-set in the way that the silicon sealing is pressed against it with a gentle pressure and closes completely air tight. Over time, however, the pressure can change.
-
For a high quality closure, an asymmetrical mushroom cap is used, which enables that a manually opened pet door can be turned frontal with a TORX T15. By rotating (up to 360 degrees), the contact pressure of the door leaf can change.
-
The door closes more easily when the flattened side of the pane is facing inwards
The pet door does not respond to the remote control
-
Check that the protective foil at the bottom of the remote control has been removed.
-
Check that the battery is not inserted the wrong way.
-
The remote control works like your TV remote control with infrared. The transmitter of the remote control is located at the upper end, which needs to point towards your pet door. The range is up to 10 meters and decreases to the side.
-
The remote battery can possibly be empty. In this case, replace it by a corresponding new battery.
-
Check if the IR-switch in the remote control compartment is not damaged and looks like in the picture:
RFID Problems
What can I do, if the door doesn't recognize the implanted transponder?
In the use of the supplied RFID transponder might not be an acceptable alternative, implantation of an additional chips might be an option.
In this case, please test the chip before it is implanted. Once implanted it might be necessary to register your pet in various positions in front of the door, as the door reacts on the chip that responds first and in certain occasions the old one might still be quicker.
Operation
How to use your petWALK pet door
General
After connecting the door to the current (AC adapter plugged in or flush-mount power supply after switching on the current), the petWALK pet door is in Operating Mode.
All functions of the door system can be conveniently and easily controlled by a remote control. Each key has been assigned a single function.
The large unmistakable symbols on the keys correspond to the symbols on the display of the petWALK pet door.
The current operating state of the door is displayed on the screen in traffic light colours (e.g. „green“ meaning ON or PERMITTED, „red“ meaning NOT ALLOWED). Thus by a quick look at the display you get at any time an overview of the operating status.
This section will explain some basic rules and settings for a comfortable and safe operation.