The pet door does not respond to the remote control
-
Check that the protective foil at the bottom of the remote control has been removed.
-
Check that the battery is not inserted the wrong way.
-
The remote control works like your TV remote control with infrared. The transmitter of the remote control is located at the upper end, which needs to point towards your pet door. The range is up to 10 meters and decreases to the side.
-
The remote battery can possibly be empty. In this case, replace it by a corresponding new battery.
-
Check if the IR-switch in the remote control compartment is not damaged and looks like in the picture:
When you plug in the power supply for the first time the display remains dark
-
Check if the power is actually switched on (power socket, fuse).
-
Check if the connector of the power supply is actually connected to the door.
-
Verify that the 3 connection cables are stuck between the inner and outer flange
Troubleshooting
Small Problems quickly solved
General
petWALK Pet doors are built very robust and have proven themselves over many years in the global heavy use of the tropics to the Arctic Circle, by beautiful family house to shelter. Nevertheless, they are highly complex devices which sometimes have problems or questions may arise during operation.
In the following sections, we show you how you can fix most problems quickly yourselve.
Error Message in Display
E01 - DOOR CONTACT ERROR (Door could not open)
Error Cause:
This error message is displayed when the door leaf is blocked during the opening process.
If this blocking item is removed at the next opening attempt the petWALK pet door will operate again normally. For information purpose the error message remains on the display.
Error handling:
Check if any object prevents the petWALK pet door from opening or if any other reason exists which stops the opening process.
If you have removed the blocking item from the swivel range of the pet door, confirm the error message by pressing the OK button on your remote control. The error message on the display will disappear.
E02 - ERROR DURING CLOSING PROCESS (Door blocked)
Error cause:
This error message is displayed when the door meets an obstacle during the closing process and thus is not able to close.
If the door meets an obstacle during the closing process, it will stop immediately. After a waiting period of 2 sec an acoustic signal will sound and another closing attempt will start.
After the 3rd unsuccessful attempt this error appears on the display.
These closing attempts are carried out until the obstacle has been eliminated. The error message remains, however, to inform you of this fact.
Error handling:
If the petWALK pet door is still open, you have to remove the obstacle. If the pet door is closed again, you should check which object has prevented the door from closing to avoid this situation in the future. Afterwards you confirm the error message by pressing the OK button on your remote control. Thus, the error message disappears on the display.
E03 - DOOR DOES NOT CLOSE DESPITE OF RUNNING DRIVE MOTOR
Error cause:
E03 is displayed, if the door does not close within a given time period although the engine is running. The reason could be a loose slip clutch because of age-related wear and tear. This is not a restriction in normal operation.
The slip clutch serves as an additional safety device in operating process to prevent pinching even in case of an electronic defect. Over time, the slip clutch can get loose due to normal use. This is absolutely no security risk, since pressure on an obstacle in the door will even get lower. But the grinding of the slip clutch accelerates the process of attrition, which may cause the effect that the clutch begins to slip even in normal operation and at some point will no longer close. In this case, we recommend servicing the petWALK pet door. You will find further information on our website.
In the chapter "Frequently Asked Questions" you can also find more information on setting the slip clutch and under what conditions you can do this.
Error handling:
When the door is still open, you have to remove the obstacle. When the door is closed again, you should check what could have prevented the pet door from closing to avoid this situation in the future. Afterwards you confirm the error message by pressing the OK button on your remote control. Thus, the error message disappears on the display.
Use the following video as a manual to adjust the slip clutch or print the instructions.
E05 - WRONG POWER SUPPLY CONNECTED
Error cause:
This error means that the input voltage does not match with the actual configuration of the pet door.
This could happen e.g. if the door is connected to a 12-volt power supply and the battery pack is connected. In this case charging of battery is not possible.
Error handling:
Confirm the error message with the OK button on your remote control. Thus, the error message on the display disappears.
So the functionality of the pet door is not affected for a certain period. But you should switch to 24V input voltage as soon as possible in order to charge the backup battery for emergency operation or unplug the backup battery.
E06 - ERROR DURING ADJUSTING THE RFID ANTENNA
Error cause:
This error code indicates that a tuning of the antenna is not possible, because e.g.the connection cables have been interrupted.
The integrated RFID antenna is tuned automatically during initial installation and periodically once a day. If tuning fails the system shows this error.
Error handling:
Confirm message with the OK button on your remote control. Thus, the error message disappears on the display.
The pet door can still be operated but only by motion detection. To eliminate the error, please contact our service support team or one of our contractors.
A00 - INTRUDER ALARM
Error Cause:
This error message is displayed with a simultaneous alarm signal when the petWALK pet door has lost the door contact in closed state and so has been forced open.
Error handling:
If this error occurs, the pet door might have been broken up by force and needs to be repaired or replaced. You can disable this error message and the alarm signal by pressing the OK button.
In very rare cases, this alarm can also be triggered, when a heavy object hits the pet door in the exact moment of the door starting the locking engine and so the pet door ruptures just before the blockage (e.g. due to stormy weather). In this situation, you will find your pet door with this error message in the closed state, since it was able to close during the next attempt. Then the error message refers to this problem and you just need to confirm with the OK button. The animal door is ready for use again. Nevertheless, you should check your pet door for damage.
Startup problems
The door does not close (can not easily be moved in the closed state)
-
Basically, the door panel is factory-set in the way that the silicon sealing is pressed against it with a gentle pressure and closes completely air tight. Over time, however, the pressure can change.
-
For a high quality closure, an asymmetrical mushroom cap is used, which enables that a manually opened pet door can be turned frontal with a TORX T15. By rotating (up to 360 degrees), the contact pressure of the door leaf can change.
-
The door closes more easily when the flattened side of the pane is facing inwards
The pet door does not respond to the remote control
-
Check that the protective foil at the bottom of the remote control has been removed.
-
Check that the battery is not inserted the wrong way.
-
The remote control works like your TV remote control with infrared. The transmitter of the remote control is located at the upper end, which needs to point towards your pet door. The range is up to 10 meters and decreases to the side.
-
The remote battery can possibly be empty. In this case, replace it by a corresponding new battery.
-
Check if the IR-switch in the remote control compartment is not damaged and looks like in the picture:
When you plug in the power supply for the first time the display remains dark
-
Check if the power is actually switched on (power socket, fuse).
-
Check if the connector of the power supply is actually connected to the door.
-
Verify that the 3 connection cables are stuck between the inner and outer flange
Problems during operation
Door does no longer react on remote or on pet
In rare cases it can happen that the door stops responding. As with a computer, a restart will fix the problem in most cases.
The easiest way is to unplug the power supply from the wall socket and wait until the battery is discharged and the door has shut down and all lights are extinguished in the display. This might take a few hours. Then plug in the mains power on again. The door will function normally again.
The models "Super-Silent" and all doors manufactured after 1.1.2015 (serial number higher than xxx01Dxxxxxxxxxx), offer also some quicker ways:
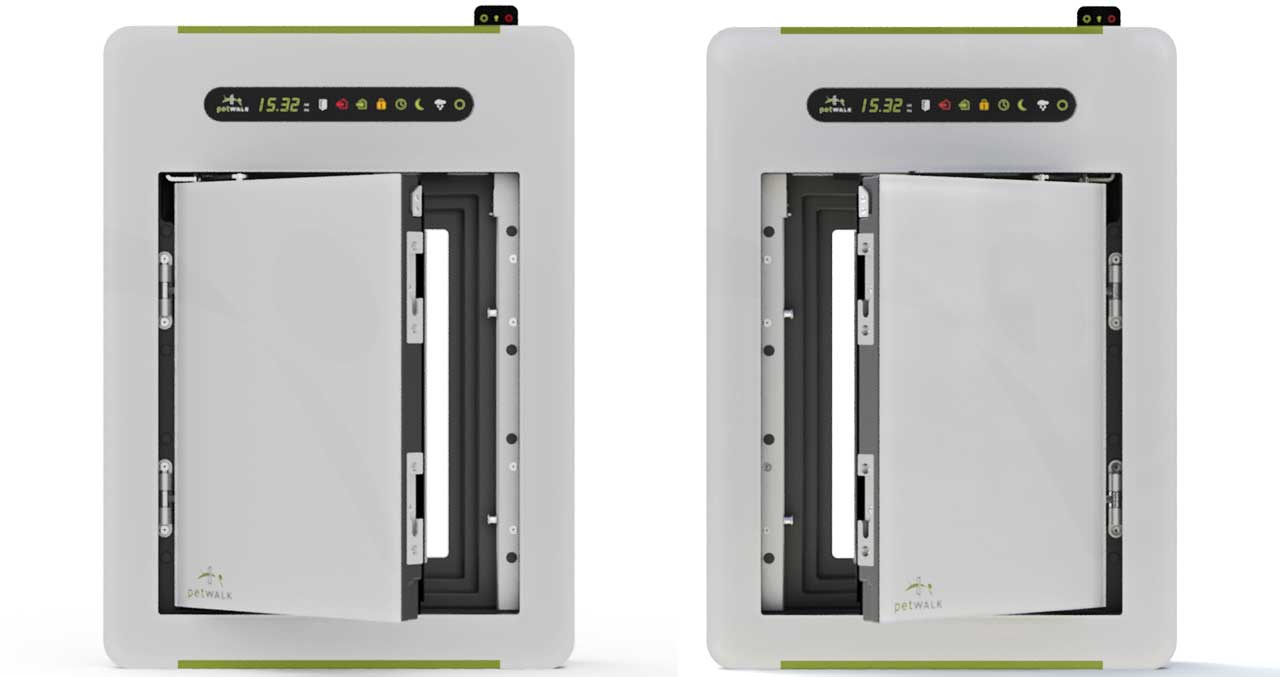
If you own a "Large" model remove the inner cover of the door leaf. You will see a small slot on one upper corner of the door leaf and a locking bolt below it. On the model "Medium" you can access the bolts without removing the cover.
Now move the upper bolt by means of a medium-sized screwdriver gently but with pressure against the resistance of the motor. You will hear a slight noise from the engine while pushing the bolts. This is normal and will not harm the door.
As soon as you open the door panel slightly, it should trigger the burglary alarm. The display should show "A00" and an alarm sound can be heard. Hold the door leaf until you confirmed the error by pressing OK on the remote control. After that, the door should function normally again.
Here's a small video showing these steps:
If no alarm is triggered, you can remove the white battery connector with the red and black wires and unplug the power supply. When using an in-wall power supply you can switch off the fuse for a short time. Plug both in again.
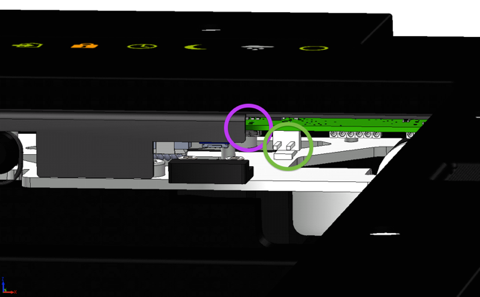
There's also a small reset button between the cover and the white battery connector in the area right above the white component, which protrudes slightly from the shroud. Here you could carefully press the reset button with a pen or similar. After a successful reboot the red circle appears in the display. After a rattling noise the pet door is initialized and ready for operation.
What should be done if the locking bolts do not always open completely and are thus blocking the door?
It could be that position of the door leaf is not correct and it is inclined. This can happen when the wing of the upper hinge has come loose and out of the door leaf for example by a blow.
Our advice: check if the door leaf is properly positioned. You can check this easily by means of the gap distances on the outside of the door module. The gaps should all be about the same on all four sides and at the edge of the door leaf be parallel to the device. See little draft attached.
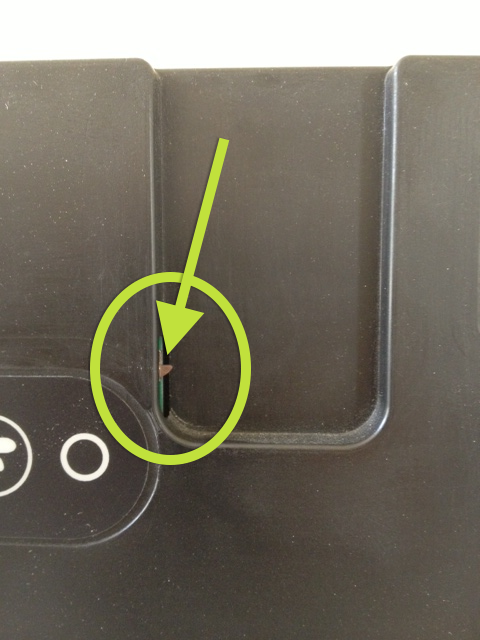
If the door hangs down, you can beat the hinge bolt of the upper hinge (green arrow) with door leaf slightly open from the bottom out of the hinge block and screw the hinge wing into the door leaf by 1/2 to 1 turn to the right (clockwise) . Then reintroduce the bolt from above and test it. If the door leaf is well positioned now and the door opens properly, punch in the bolt again easily from above.
The door does not close (can not easily be moved in the closed state)
-
Basically, the door panel is factory-set in the way that the silicon sealing is pressed against it with a gentle pressure and closes completely air tight. Over time, however, the pressure can change.
-
For a high quality closure, an asymmetrical mushroom cap is used, which enables that a manually opened pet door can be turned frontal with a TORX T15. By rotating (up to 360 degrees), the contact pressure of the door leaf can change.
-
The door closes more easily when the flattened side of the pane is facing inwards
The pet door does not respond to the remote control
-
Check that the protective foil at the bottom of the remote control has been removed.
-
Check that the battery is not inserted the wrong way.
-
The remote control works like your TV remote control with infrared. The transmitter of the remote control is located at the upper end, which needs to point towards your pet door. The range is up to 10 meters and decreases to the side.
-
The remote battery can possibly be empty. In this case, replace it by a corresponding new battery.
-
Check if the IR-switch in the remote control compartment is not damaged and looks like in the picture:
RFID Problems
What can I do, if the door doesn't recognize the implanted transponder?
In the use of the supplied RFID transponder might not be an acceptable alternative, implantation of an additional chips might be an option.
In this case, please test the chip before it is implanted. Once implanted it might be necessary to register your pet in various positions in front of the door, as the door reacts on the chip that responds first and in certain occasions the old one might still be quicker.
Setup
Configure your petWALK pet door
Basic Settings
The petWALK door comes pre-configured, so no setup required for the typical use case. If desired the system can individually adapt to your habits and distinguishes itself through attention to detail.
Nevertheless, we believe that petWALK pet doors should adapt to you and not vice versa. Therefore petWALK pet doors can be flexibly set according to your personal situation.
In this section you will find a quick guide and short video explaining you can easily make it your very personal pet entry solution.
After connecting the door to the current (AC adapter plugged in or flush-mount power supply after switching on the current), the petWALK pet door is in Operating Mode.
All functions of the door system can be conveniently and easily controlled by a remote control. Each key has been assigned a single function.
The large unmistakable symbols on the keys correspond to the symbols on the display of the petWALK pet door.
The current operating state of the door is displayed on the screen in traffic light colours (e.g. „green“ meaning ON or PERMITTED, „red“ meaning NOT ALLOWED). Thus by a quick look at the display you get at any time an overview of the operating status.
This section will explain some basic rules and settings for a comfortable and safe operation.
The petWALK pet door can be easily installed in movable components such as hinged or sliding doors.
With thin door panels of less than 10cm, the installation is similar to glass mounting, regarding installation in thick entrance doors an elegant fully integrated mounting into the door case is possible.
The panel mounting is characterized mainly by a rapid and clean installation and facilitates the smooth deconstruction in case of change of residence.
Cut out aperture
For the correct installation of a petWALK pet door the aperture for your chosen model has to be as precise as possible.
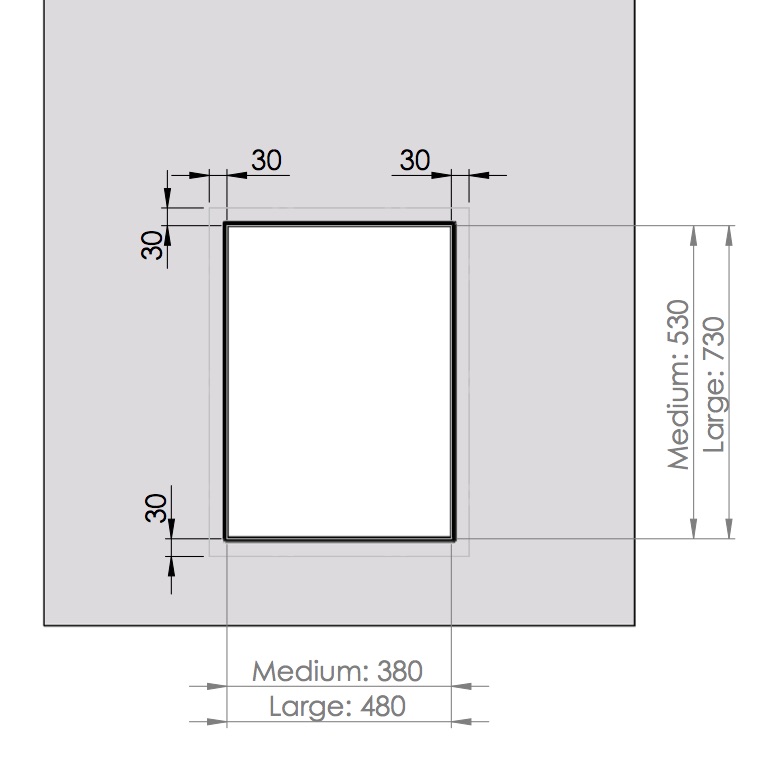
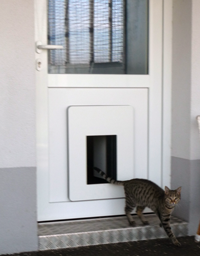
The dimensions of the aperture are 38 cm ± 1 x 53 cm ± 1 cm for the model „Medium“.
For the model „Large“ the aperture must have a size of 48 cm ± 1 x 73 cm ± 1.
It must be ensured that at least 30 mm space up to a bound of the component is available around the aperture so that the frame of the petWALK pet door can be mounted easily.
Lead the connecting cable inside of the door wing to the hinge side and use a standard transition to arrive at the frame.
For your pets’ comfort use we recommend positioning the opening as low as possible.
We also recommend using a door contact. If the wing is opened, the operation of the pet door is prevented, in case the pet door is open it will close immediately. Thus, a collision is prevented. All you need to connect the door contact to the petWALK door is a connection cable – door contact.
Position the door as close as possible to a window bar so as to be able to hide the connection cable behind it.
Tips
In cases where an outstanding degree of insulation is required, the frame of the animal door can even be covered with an additional insulation.
The standard door module is suitable for component thicknesses up to 10 cm. Depending on the component thickness, turn the threaded rods out of the outer frame correspondingly far, so that the screw will get hold of the threaded rod. When tightening the screw, the threaded rod by itself turns back again so that a secure stability is created.
Im Tierheim Schwarzatal finden viele heimatlose Tiere eine liebevolle und artgerechte Betreuung. Dazu zählt auch die Möglichkeit nach Lust und Laune zwischen Innen- und Außengehege wechseln zu können. Gerade im Winter verursachten die konventionellen Katzenklappen und offenen Metallschieber aber hohe Heizkosten.
Aus diesem Grund haben wir gemeinsam mit der Tierheimleiterin Mitte 2012 ein Pilotprojekt gestartet und zunächst ein Katzenzimmer und ein Hundezimmer mit einer petWALK Türe ausgestattet. Die Lösung hat sich im Dauerbetrieb sehr bewährt. Die Tiere haben die Türen sofort verwendet und die Zimmer sind spürbar wärmer und angenehmer geworden. Daher sollen sobald wie möglich die restlichen Zimmer folgen.
Der ORF hat in NÖ heute "Verrückt nach Tier" am 09.02.2013 über das Projekt und die Erfahrungen des Tierheimes berichtet
The petWALK door module
Worldwide unique
THE petWALK door module is the heart of your personal pet door solution. It combines the excellent thermal qualities of a high-performance window with the bulgary resistance of a security door and the convenience of automatic door opener which recognizes your animals and only opens for them.
Quality „Made in Austria“
petWALK pet doors are manufactured in Austria and only proven and high quality parts from producers from Austria, Germany, Switzerland and USA are used.
The housing is made of polyurethane integral foam (PUR) and offers excellent insulation values high mechanical strength and long life. All mechanical components are made of galvanized steel and designed just like the drive components for continuous operation. The RC2 tested fittings are from a major Austrian brand manufacturer, the silicone seals from a renowned Swiss producer.
Sizes
Due to the patented design, the excellent thermal insulation and sophisticated safety technology petWALK doors provide comfortable large through-holes.
Currently there are two sizes available fitting almost all cats and dogs.
Medium:
With a passage dimensions of 200mm width and 300mm height this model is already twice as large as conventional cat flaps. It fits both big cats and smaller dogs and allows them easily walk through the door without squeezing.
Large:
For larger dogs, we developed a model with 300mm width and 500mm height. Thus the doghouse in the garden can finally be history.
Here's a guide to find the perfect size for your pet.
Door stop
Of course, you can define the opening direction of your petWALK pet door in order to perfectly fit it to your personal living situation.
petWALK doors always open inwards. You can choose between a left and a right-hinged door.
A right-hinged door always opens inwards to the right side and a left-hinged door accordingly always opens inwards toward the left side.
Installing the petWALK pet door into a movable component such as a door leaf, we recom- mend choosing the same hinge side.
Delivery
The petWALK door module includes by default already all features. It is available in two different sizes, with different door stops and ready for all possible installation situations.
Accessories that are mandatory for your installation site will be added to your cart automatically when selecting the correct thickness of your installation body. For a wall installation you will need a tunnel set and for glass you might need additional spacer frames.
Included in the scope of delivery are a remote control, an AC adapter, an RFID collar tag and spare velcro fasteners for a decorative cover.
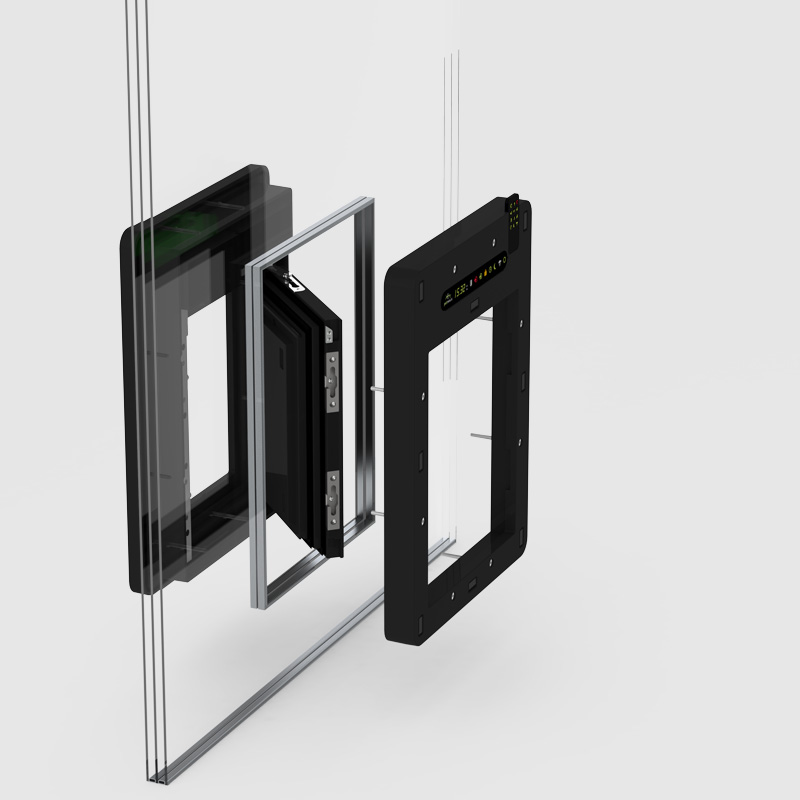
The door module itself consists of the outer frame and the inner frame, which are pressed against the component, which has a suitably large aperture, by means of threaded rods.
At the outer frame holds the engines, the automatically moving door leaf, the locking mechanisms, as well as the control electronics and a backup battery. The inner frame includes the display and the receiving unit for the remote control.
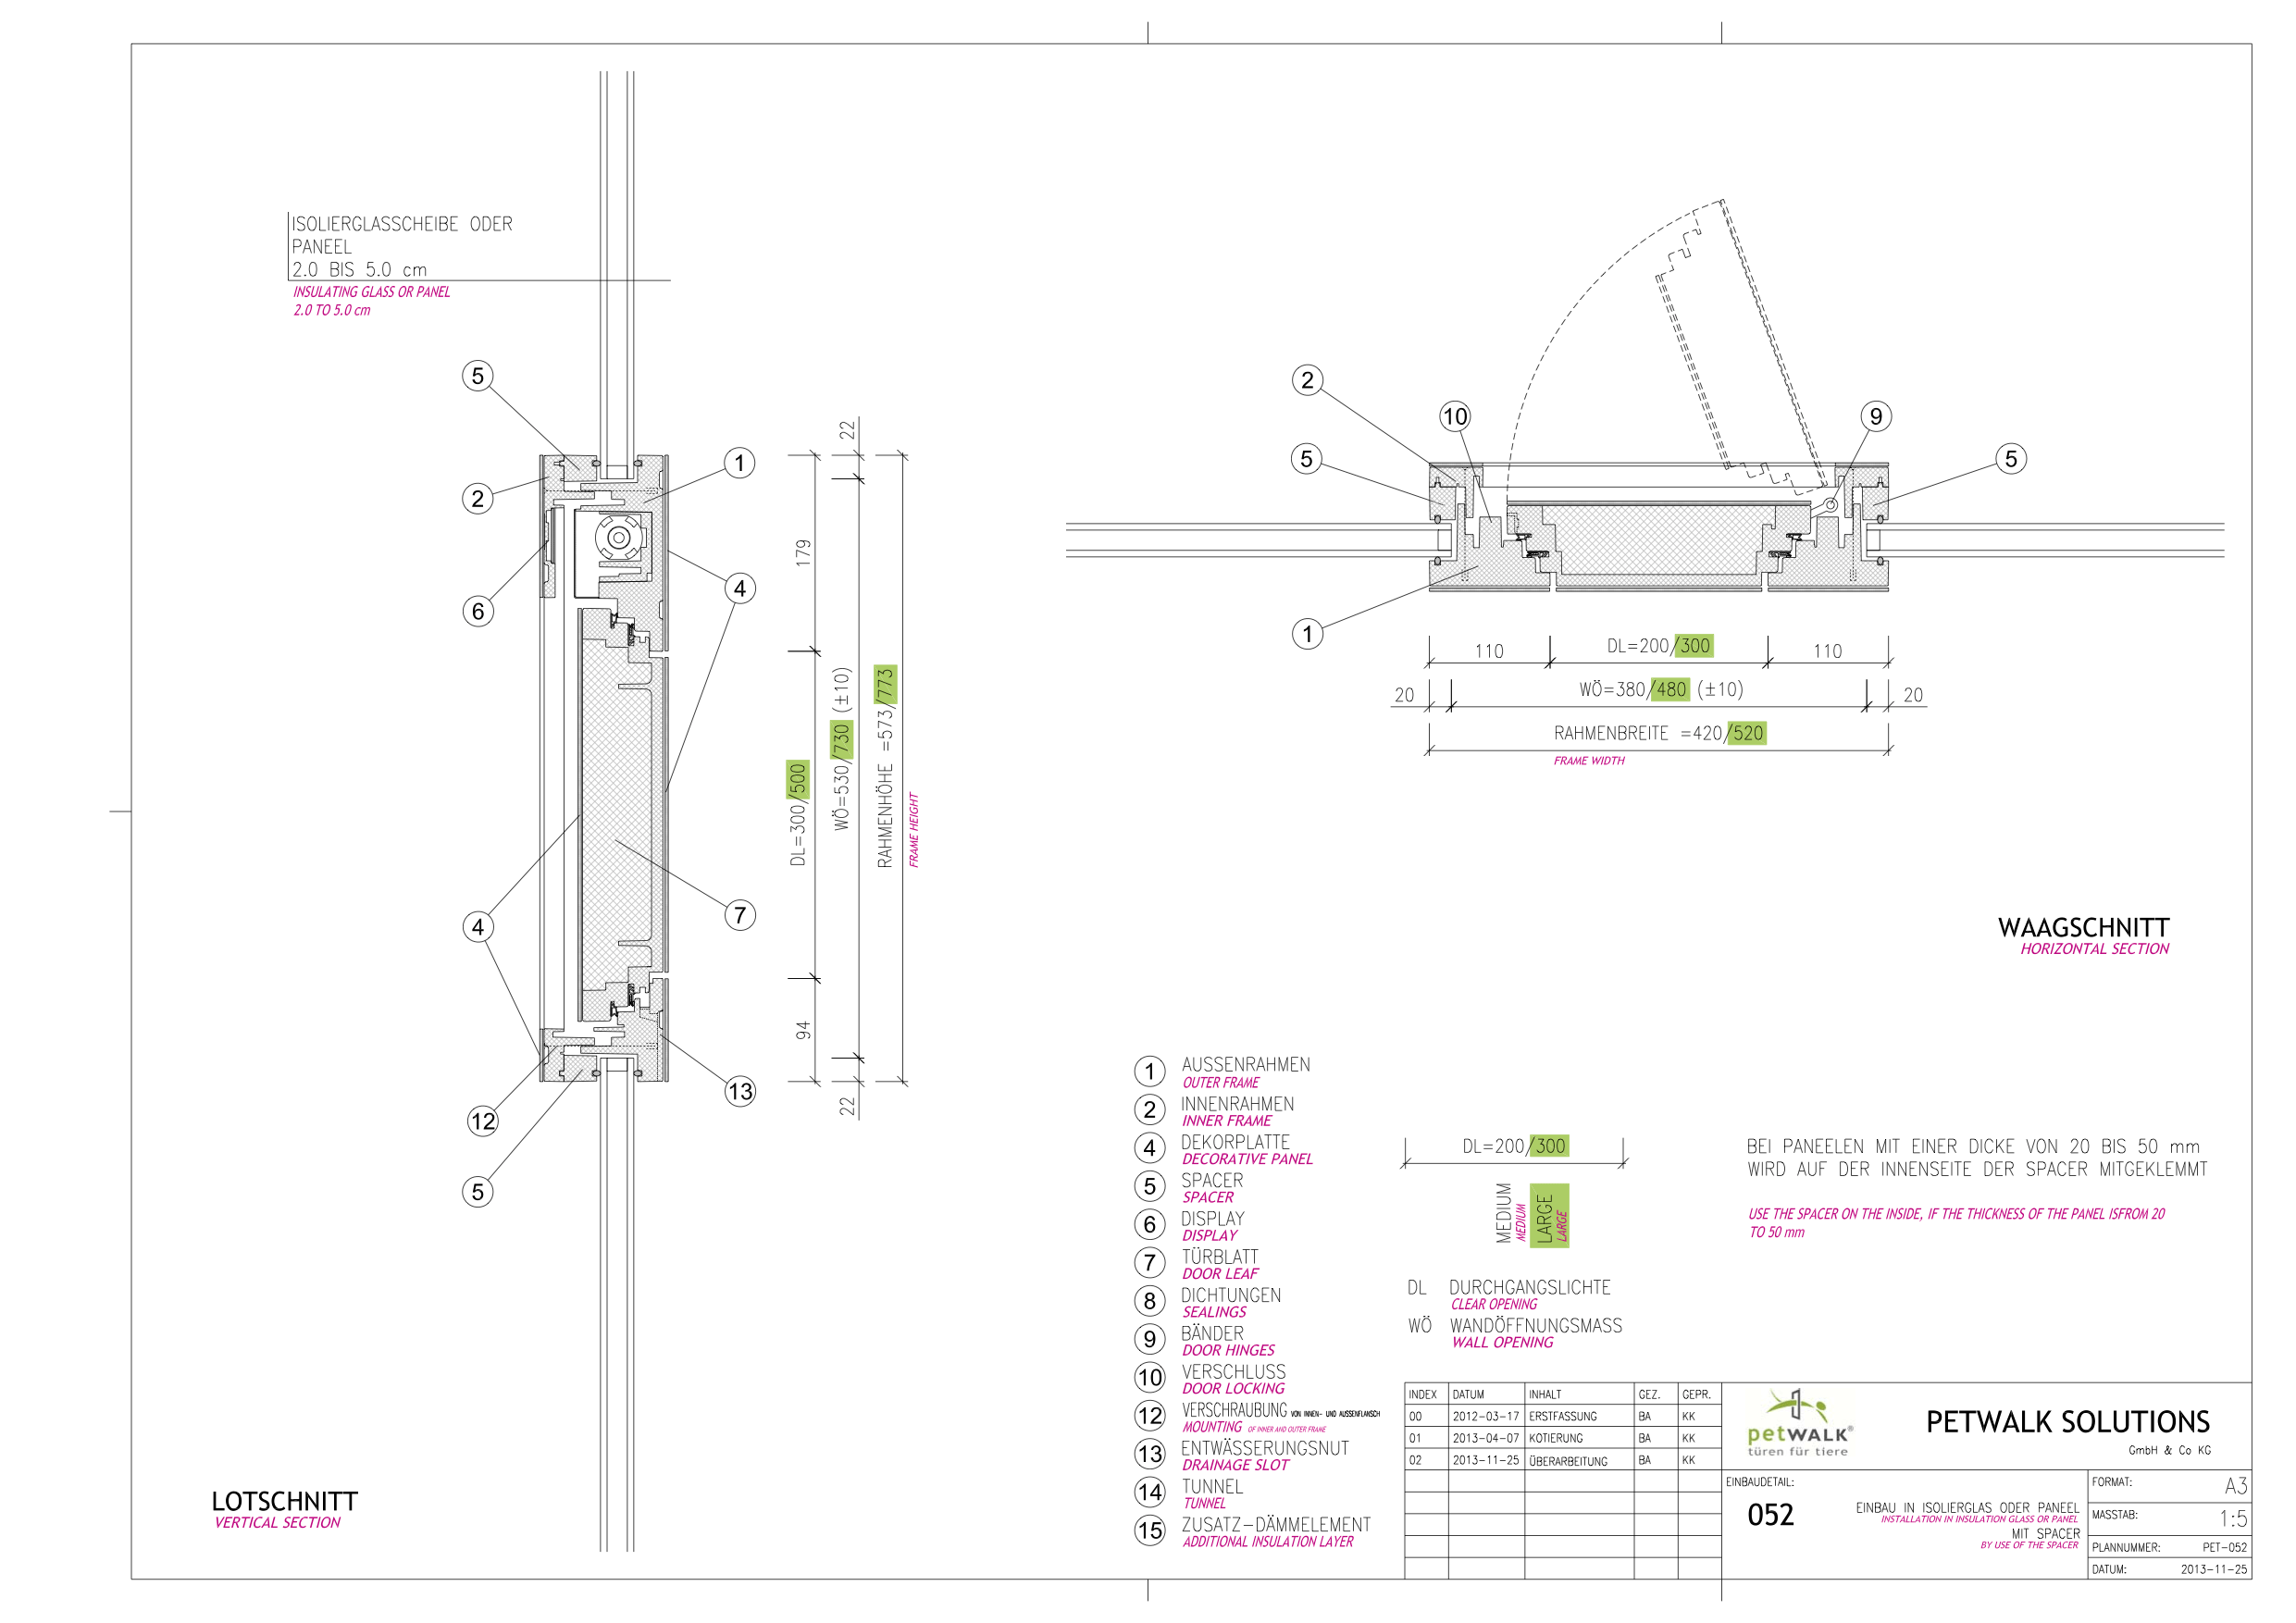
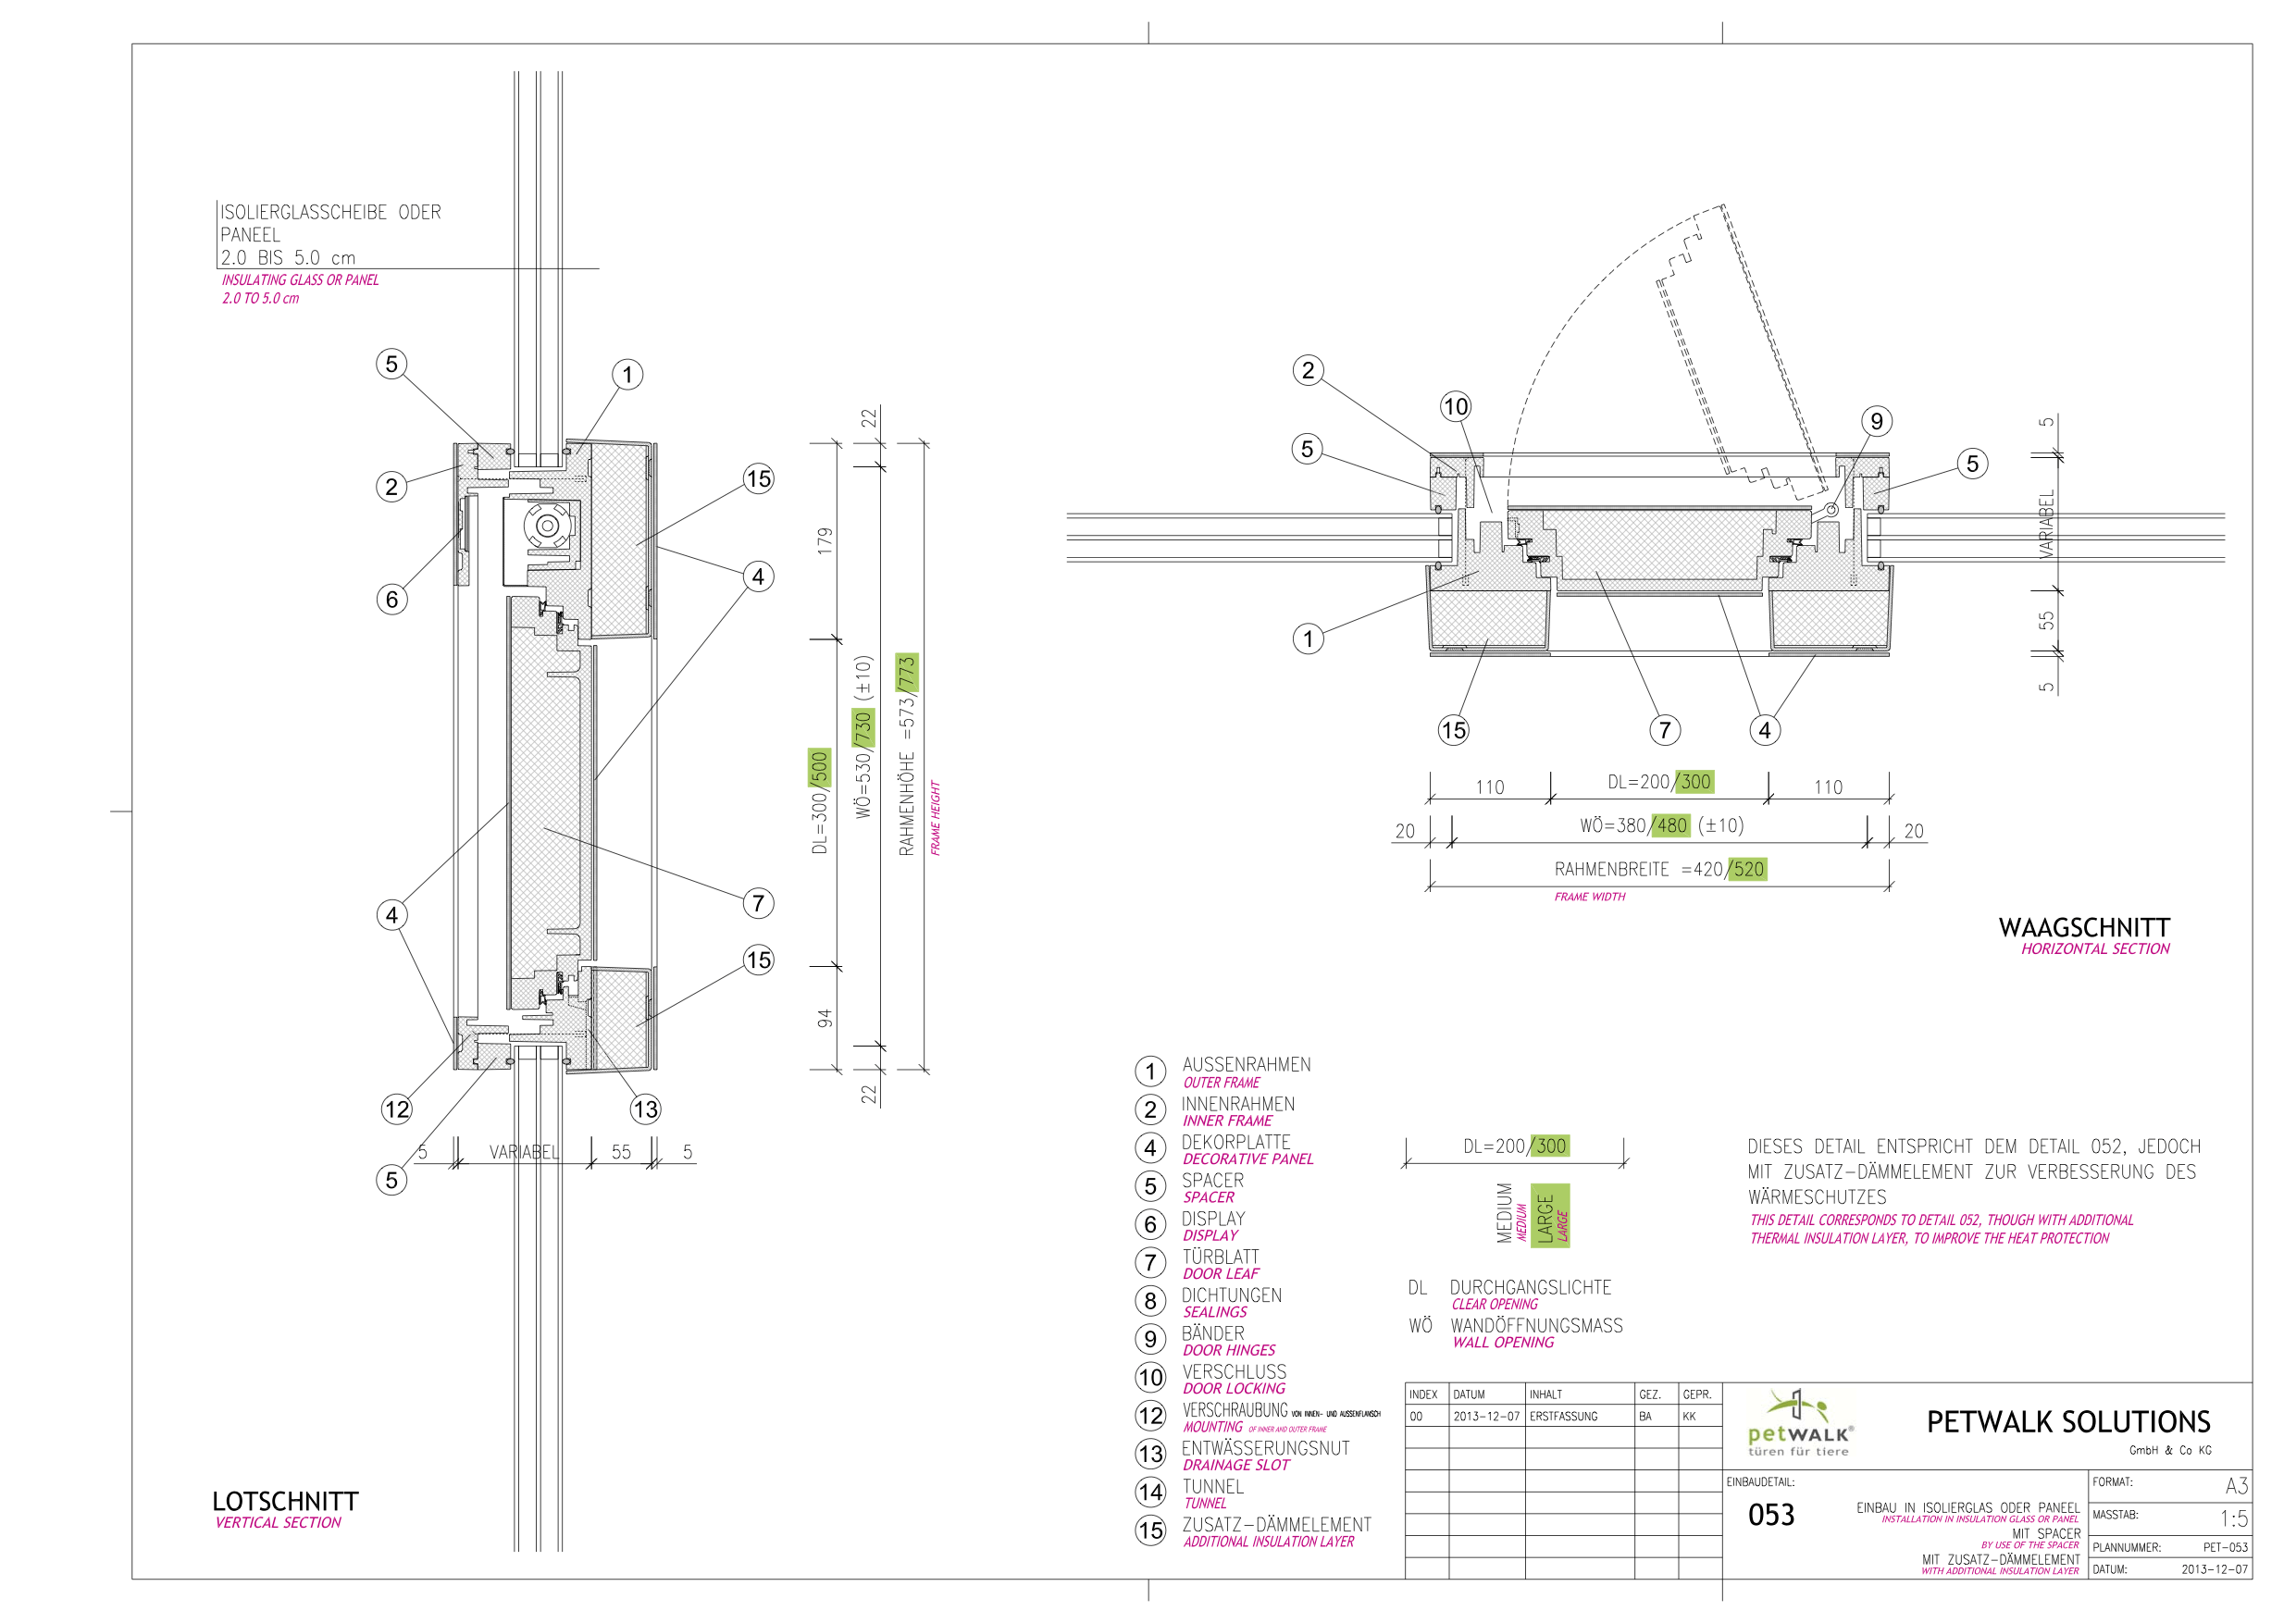
The easiest way to install a petWALK pet door is the assembly into double or triple laminated glazing. A new glass pane with the correct aperture and a firm frame around this opening has to be ordered at your window company or glazier.
Then the animal door is simply „clamped“ and the installation is done. A circumferential seal on both frames creates an air - and wa- tertight connection.
The glass installation is characterized mainly by a rapid and clean installation and facilitates the smooth deconstruction in case of change of residence.
Cut out aperture
For the correct installation of a petWALK pet door the aperture for your chosen model has to be as precise as possible.
The dimensions of the aperture are 38 cm ± 1 x 53 cm ± 1 cm for the model „Medium“.
For the model „Large“ the aperture must have a size of 48 cm ± 1 x 73 cm ± 1.
It must be ensured that at least 30 mm space up to a bound of the component is available around the aperture so that the frame of the petWALK pet door can be mounted easily.
The petWALK pet door must be installed into ESG glass/ at least double glazing. The petWALK pet door is not suitable for an installation into a single glass panel!
Some insulating glass producers demand for technical reasons a distance of opening to the outside edge of the element of at least 5 cm all round for stability reasons. Thus, a minimum recommended size of the glass element of 48 cm x 63 cm for the model "medium" and 58 cm x 83 cm results for the model "Large".
The inner edges of the glass cut may have an inner radius of up to 1cm, if necessary.
At lower glass latitudes a cross-bar (horizontal bar) just above the planned installation position of the door can be installed and a correspondingly smaller sized glass pane can be designated at the top.
Position the door as close as possible to a glass bar. So you can easily hide the connection cables behind it.
Tipps
When installed in a door leaf, we recommend using a door contact.
If the wing is opened the function of the pet door is prevented, with an open door the petWALK pet door closes immediately.
Thus, a collision is prevented. For connection to the petWALK door a door-in-door connection cable is required.
In case there are especially high demands on the thermal insulation properties of the pet door, you can reduce the already excellent U-value to less than 0.5 W/m2K using the optional frame insulation.
By default the petWALK pet door module is suitable for component thicknesses up to 10 cm. Depending on the component strength, turn out the threaded rods correspondingly far from the outer frame out, so that you get hold of the screw the threaded rod. When tightening the screw, the threaded rod by itself turns back into it accordingly so that a secure hold is given.
At lower latitudes glass a cross-bar just above the planned installation position of the door could split the plane with a correspondingly smaller dimensioned glass pane at the top. The petWALK pet door can then be mounted in a cartridge ready made below the bar. It should be noted that circumferentially still at least 30 mm of space needs to remain available from the side edges of the opening up to a limit of the component. In the same way the door would be fitted into a door panel with smooth surfaces.
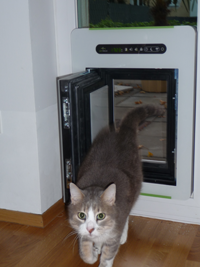
Anforderung: Gleichzeitige Benutzung von Hunden und Katzen mit implantierten Transpondern
Umsetzung: Der Fixteil einer Terassentüre wurden durch ein Panel getauscht und in dieses die petWALk Türe eingebaut.
Rückmeldung:"Super Tiertüre und der Service der Firma ist äusserst zuvorkommend und herzlich. Ich hab schon Filmchen gepostet...:-) Wir haben die Türe nun ein Jahr."
Unsere Tiertüre, sowohl für die Katz als auch für den Hund
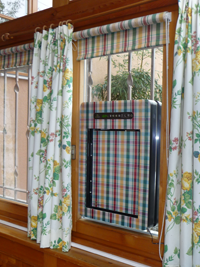
Eine tierliebende Familie wollte zwei in die Jahre gekommenen Streunern einen warmen Unterschlupf für kalte Winternächte bieten und hat dafür den Vorraum des Hauses vorgesehen. Die beiden Kater sollten weder einen implantierten Chip noch ein Halsband bekommen. Die petWALK Tiertüre wurde dazu in einen Fensterflügel eingebaut und das Dekor den Rollos angepasst.
Rückmeldung:
"Es war einfach wunderschön zu sehen, wie sehr sich die beiden Kater über die neue Türe gefreut haben und aufgeblüht sind. Obwohl gerade ein Kater große Angst hat, eingesperrt zu werden, hat er in kürzester Zeit Vertrauen zur petWALK Türe gefasst und der andere hat einfach ein Lächeln im Gesicht, wenn er stolz durch "seine" Türe geht."
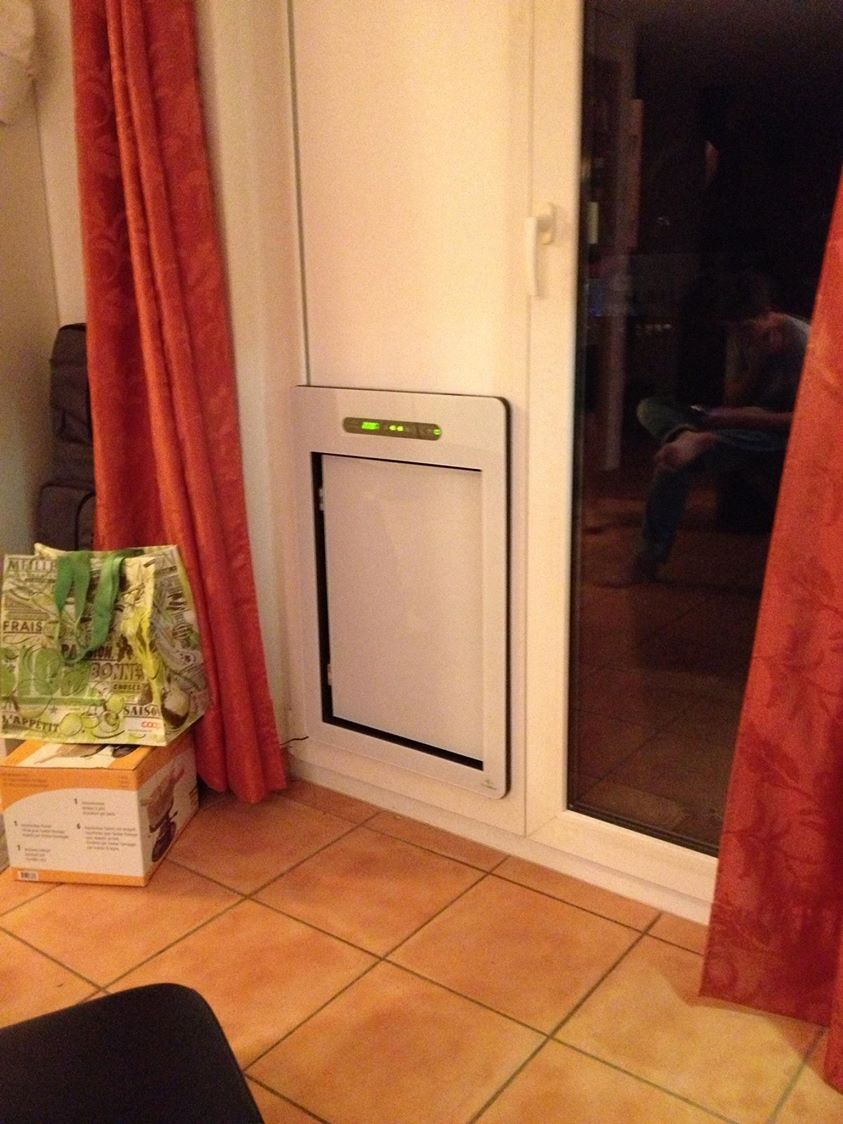
Die junge Famile ist mit Ihren beiden Katzen und ihrem Baby in eine neue Wohnung mit großem Garten gezogen. Der großzügige Wohnraum ist zum Garten hin fast vollständig verglast. Der Einbau der petWALK Tiertüre erfolgte in einem sehr schmalen Seitenteil mittels eines Paneels, auf dem die Glasscheibe steht.
Rückmeldung:
"Wir wollten, dass unsere beiden Katzen den Garten benutzen können, ohne dass wir uns Sorgen um unseren kleinen Sohn machen müssen oder die Wohnräume durch undichte Katzenklappen kalt und ungemütlich werden.
Nur petWALK Tiertüren sind absolut winddicht und können die implantieren Tierchips auch für die Ausgangskontrolle nützen. So öffnet die Türe für unsere Katzen, aber nicht wenn unser Kind davor spielt. Einfach klasse!"
Umsetzung: In einer bestehenden Terassentüre wurde die Glasscheibe durch eine Scheibe mit dem entsprechenden Ausschnitt getauscht.
Rückmeldung:
"Die Tür ist sensationell.
...der Glaser hat ziemlich lange auf sich warten lassen...
...unser Kalle hat die Funktionsweise innerhalb von Minuten verstanden..."
Thermal properties
Basic characteristics
The housing of petWALK doors is made of rigid polyurethane integral skin foam. This material combines low thermal conductivity (0.08 W / m * K acc. To DIN 53 432) with good mechanical and structural properties and durability. Due to fact that the parts are manufactured in one piece, there is also no danger of leaking seam surfaces and minimal deformation during temperature fluctuations due to the homogeneous structure.
Due to the material characteristics (open-cell foam) minimal air entrapment at the surface can not be excluded. This is not a quality defect!
All cavities are lined with polyurethane foam moldings, which have excellent thermal conductivity of just 0.028 W / K m. petWALK doors have a thermal conductivity [W / K] calculated of 0.29 W / K, resulting in a calculated heat transfer coefficient of 0.8 W / m²K for the entire component.
The air-tightness is achieved with the aid of two wrap-around silicone seals. The tightness class 4 according to EN 12207 - 1999-11 (Q100 = 0.75 m³ / hm) is significantly exceeded with a value of Q600 0.0 m³ / hm .
For all recommended installation types the minimum occurring surface temperature of the inner component boundary surfaces, according to ÖNorm B8110-2, with a temperature factor > 0.71 in all cases over the required limit, so condensation and thus with no risk of mold formation can be ruled out.
Increasing the thermal quality
Additional frame insulation
If an improvement in the thermal insulation properties is required, an optional cover can be used for insulation of the outer frame. This solution is especially recommended for enclosing fitted and especially when used in glazing and door elements. Here, a frame insulation made out of PU rigid foam with a thickness of approximately 5 cm above is clipped on the frame, thus improving the thermal conductance [W / K] as calculated at 0.18 W / K. This results in a calculated heat transfer coefficient of 0.5 W / m²K.
Over insulation of the frame
In the case of wall installation, the building insulation can be drawn over the outer frame of the door and a petWALK soffit are formed around the door leaf. Thus the insulation properties are greatly improved and the door seamlessly integrated into the building envelope without much additional effort
The petWALK safety concept
In developing the petWALK animal door we were aware of our responsibility for your beloved ones and therefore have installed a number of different and independent safety systems.
Motion monitoring
By means of two very sensitive motion sensors (in the doorway above the door leaf and at the bottom of the door leaf) the petWALK pet door recognizes humans and animals and closes only once within a defined period includes (see the chapter "10.2.2 SETTING THE DOOR OPENING TIME, page 51) no movement is detected.
If your pet remains motionless in the door area, it may happen that the door leaf begins to close anyway because the sensors could not detect movement. This is the same effect that you might know of elevators and automatic doors in Department Stores, if you stand in the door or entering short while closing the door space. But this is not a problem, because the next safety measure, namely the engine current monitoring comes into force.
You can check by moving your hand with an open door leaf in the swing area of the door leaf this yourself. It should always either flashing orange icon output control input or control and not close the door panel. However, once you hold your hand for the set period so quiet that no symbol appears, the door will try to close.
Electronic jamming protection (motor current monitoring)
Even a slight resistance when closing or opening the door brings the door immediately to a halt and let them go a little in the opposite direction. After some time the petWALK pet door will try agin to close the door after a warning tone with a bit more pressure, but still careful. After several unsuccessful attempts, the door goes into alarm, to indicate a problem. It could be an object blocking the door.
You can check for yourself by leaving your hand steady in the swing area, so that the door leaf runs against it. You have to not be afraid, because in the event of any electronic malfunction, there is also another, as described below, mechanical safety. After four attempts, the door should report the error "E02" on the display.
Should the door leaf not stop immediately and run a bit into the opposite direction but instead exert a very slight, continuous pressure and report the error "E03" after a few seconds, the mechanical safety device is set too soft. You can correct this yourself using the manual.
Mechanical pinch protection (slip clutch)
The drive motor is connected via a mechanical coupling to the door leaf, which automatically interrupts the power transmission at a set resistance.
This resistance is set to a value which ensures that the door can't cause serious injuries, such as a fractures, even during failure of all electronic security features.
Due to wear and tear the clutch can become softer over time. If the resistance level finally falls below the threshold of the electronic jamming protection, the clutch will bypass the electronic limiter. In this cas you need to tighten the clutch again.
You can test this mechanism yourself easily by ascending the open door leaf by hand and move. This should be possible without great effort. The strength that you need to move the leaf is also the maximum force that can theoretically act on a trapped object.
Mechanical anti-trap
In order to move the door leaf as gently as possible, but still be able to lock the door, we have specifically chosen the expensive and elaborate way and built in two separate drives.
The door drive just gets as much power as absolutely needed for the movement and the locking motor can only be activated when an electrical contact is closed and the gap on the far side from the axis is below 8mm.
This is ensured by a small wedge at the top of the door leaf, and a bolt on the locking mechanism. Only when the gap is in the safe area, the bolt can pull the door panel, otherwise it blocks the closing of the door leaf.